Forest Building, University of Tasmania, Hobart
Overview
This guide is for people attending the Universal Design for Learning Symposium at the University of Tasmania, 24-26 June 2026.
The Symposium will take place in The Forest, a newly opened university building in the Central Business District of Hobart.
The Forest Building can be accessed by the public in two main ways:
- Through the glass-domed forest area at 83 Melville St to Level 1 of the building
- Across a pedestrian bridge from Brisbane St to Level 2 of the building
The Melville St entrance is quite impressive and engages your senses. You will transition from the street, to the warmer forested dome, then to the open space of the main public section of the building. This is the most direct way to get to the symposium registration desk.
The Brisbane St entrance is a gentle introduction to the building, where you cross a footbridge to a quiet part of level 2. The toilets, lift and stairs are all located near this entrance. This can be helpful if you need time to get your bearings when you arrive, or take a bathroom break before heading to your symposium activities. There are also plenty of tables and chairs here if you need to rest or get organised.
We’ll guide you through both entry options in the following pages. There will also be guided tours of the building on Wednesday 24th at 12.00, 12.30 and 4.00 pm, and on Thursday 25th at 8.00 and 8.30 am.
1. Melville St entrance
The photo below (Figure 1) was taken from across the road from the main public entrance to the Forest. In the centre is a glass dome filled with plants, and on either side, there are brick buildings.
The doors to enter the building are in the centre of the glass dome section. The dome is set back from the street a little, so if you are walking along the footpath, it won’t be visible until you’re quite close.
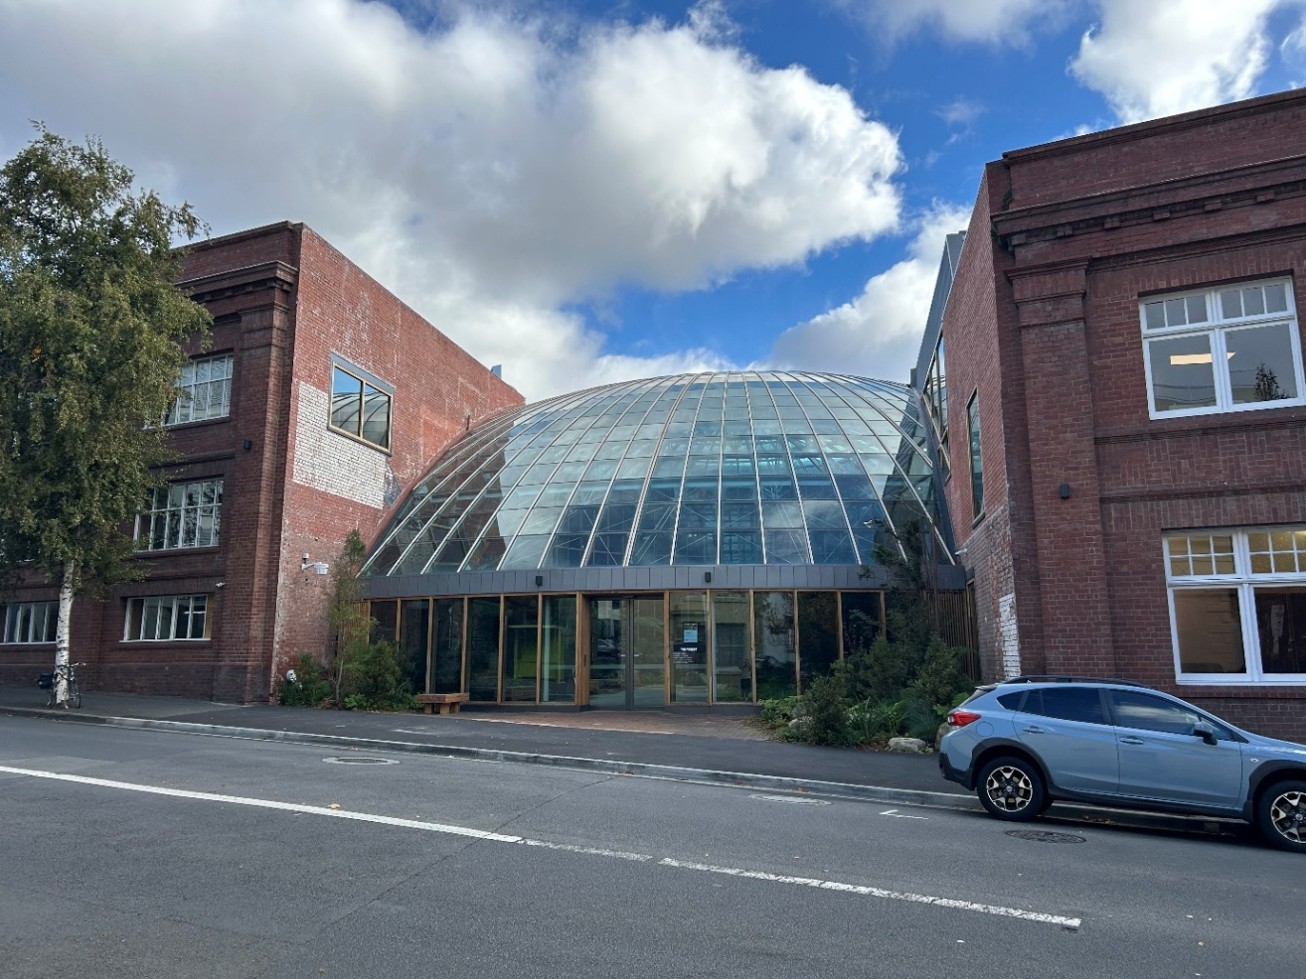
There is a loading zone out the front you can use if you’re arriving by taxi or Uber. However, please note there is no cut curb in this spot. There is an accessible parking zone at the Brisbane St entrance, or a cut curb further up Melville St. There’s a photo of this on the following page.
Walking along the footpath from Melville St
The next two photos show you the view walking along Melville St towards the Forest. In each photo, you can see both of the brick buildings, but not the glass dome between them.
Figure 2 below was taken after turning left from Elizabeth St. It also shows you the nearest cut curb to the building. It’s about 30 metres away from the entrance.
Figure 3 below was taken after turning right from Murray St.
Arriving at the Melville St entrance
If you continue along Melville St towards number 83, the gap between the two brick buildings will become visible, and you’ll see glass dome set back from the street. There are plants on either side and brick paving out the front.
The photo below, Figure 4, shows the entrance after turning right from Murray St.
To enter, go to the centre of the glass section, and there will be a set of sliding doors. Please see the following page for the details.
Entrance to the Forest Dome
There is a set of automatic sliding glass doors at the entrance of the Forest Dome. These doors are open to the public, and will open as you walk towards them.
The photo below, Figure 5, shows these doors partially open, giving you a reflection of the buildings across the street, and a glimpse inside into the paved dome section. There are often sandwich board signs in this space with information for students or visitors.
Expect a change of temperature when you go inside. It will usually be warmer than outside. It will also have a range of garden, or forest-type, smells.
Walking through the Forest Dome
Inside the dome, there is a wide paved path that curves gently to the right. On either side are garden beds with tree ferns and other Tasmanian forest plants. There is wooden seating on the left if you would like to sit and enjoy the atmosphere.
The domed roof is very high and you can see the sky through the glass, so it’s quite a unique way to enter a building!
Continue following the path, and you will find another set of glass doors to enter the main building.
Figure 6 below shows the view just after entering the dome. There is a boulder in the centre of the pathway towards the back of the dome. Take care not to crash into it.
Leaving the Forest dome
As you continue following the path around to the right, past the boulder, there will be a set of glass sliding doors in front of you. They are at about a 45-degree angle from the centre
This is the transition into the main public space of the Forest building. There are two sets of glass doors to go through.
In the photo below, Figure 7, these glass doors are visible at the end of the paved path.
Inside Level 1 of the Forest
Once you have passed through the two sets of automatic glass doors, you will find yourself inside a wide, open space with lots of wood panelling and plants. There is also a giant tree stump to your left as decoration.
Opposite the entrance is a ramp, and next to it, a large screen where you can access UniMaps for wayfinding. This is pictured in Figure 8 below.
The registration desk for the symposium will be to the right of the entrance. Volunteers will be wearing pink hi-vis vests, and will be very happy to help you!
2. Brisbane St entrance
On Brisbane St, there is a staff entrance and a public entrance. The accessible parking is very close to the staff entrance, so for some people this may be the most practical way to enter the building. We can arrange access to this part of the building, so please keep that in mind as you read through the guide. Please contact Darlene via email at darlene.mclennan@utas.edu.au.
Parking area
There are five parking spaces opposite the staff entrance in a brick-paved area just off Brisbane St. Two of these parks are disability parking spaces, and two are temporary disability parking spaces. Both types of parking require a valid disability parking permit.
Figure 9 below shows the parking spaces. The staff entrance is directly behind the person taking the photo.
Staff entrance to Level 2
The staff entrance is a curved alcove leading into the building from the parking area.
There are four large boulders arranged in a curve to form a circular shape with the building entrance. The boulders are unevenly spaced, and not all spaces will allow for a wheelchair or scooter to pass through.
Figure 10 below was taken to show the sliding doors in the centre of the building, aligning with the widest space between the boulders.
There are wooden benches on the right-hand side of the entrance, opposite the parking.
If you need any additional information about this entrance, please do get in touch to discuss with Darlene via email at darlene.mclennan@utas.edu.au.
On the far left of the photo below a bitumen footpath is visible. To access the public entrance to Level 2, follow this footpath along until you reach the next paved area on your right.
Walking along footpath on Brisbane St
Travelling from the staff entrance to the public entrance, you will have the building on your right. You will go past two large trees on your left. In places the footpath is a little narrow, particularly passing the trees. At the base of each tree is some gravel that has been glued in place, so there are a few different surfaces.
Figure 11 below was taken from outside the public entrance, back looking along Brisbane St towards the staff entrance and the parking area.
There are several 1-hour paid parking spaces on the road just outside the building, visible on the right-hand side of the picture below.
Footbridge to the public entrance to Level 2
Turn to your left from the view in the photo above, and you will then be facing the Level 2 public entrance. There is a large wooden sign with arrows giving directions: to the left is the footbridge, and to the right, several flights of stairs that will take you down to the back entrance of Level 1.
This entrance to the building has a bit more of an industrial feel, with the stainless-steel rails along the brick-paved footbridge, and graffiti on a neighbouring building. The footbridge veers a little to the right, then turns slightly to the left, before ending up at the building entrance.
Entering Level 2 of The Forest
At the end of the footbridge is the entrance to the building. This entrance is open to the public between 8am and 5pm. During these hours the glass sliding doors will open automatically as you approach.
After passing through the first set of doors, pictured in Figure 13, turn right and continue through a second set of glass doors.
Figure 14 below gives you a glimpse inside the building through the second set of sliding doors to a spacious paved area. There is a tall black panel to the left with a screen displaying UniMaps for wayfinding, and a range of seating in the distance.
Bathrooms near the entrance of Level 2
Once inside, you will find yourself in a more traditional building space than the Level 1 entry through the Forest dome. To your left are the toilets, all of which are All Gender.
Getting to the registration desk via lift or stairs
The registration desk is on Level 1, so you will need to use either the stairs or the elevator to get there. Continue through the sliding doors at the entrance, past the bathrooms on your left, and you will find the elevator on your right. Just past the elevator are the stairs to Level 1. These stairs are quite wide, but are spiral stairs curving tightly to the left. It means that walking on the right-hand side will give you the most space and stability walking down if you choose that option.
Exiting the elevator or stairs on Level 1, turn to your left, and you should see the registration desk and the friendly volunteers, ready to help you! They will all be wearing pink hi-vis vests.